posted by 방랑군 2012. 1. 8. 00:50

  Repeater.aspx 코딩부분....  ==> 두번째 이야기 에 코딩 덧붙인 것입니다..;;;

 <button id="btnTest_button" name="btnTest_button"

       onclick="return fn_Test(); runat="server">Toggle Button</button>
 <input type="button" id="btnTest" name="btnTest"

                     onclick="return fn_Test();" value="Toggle Button_2" />
 <input type="hidden" id="hdnAllValue" name="hdnAllValue" />
 <asp:HiddenField ID="hdnServerValue" runat="server" />

 Repeater.aspx - 자바스크립트 코딩 부분

 <script type="text/javascript">
  function fn_Test() {

   // 테이블 id ==> tblObj
   var tmpObj = document.getElementById("tblObj");
   // 토클효과를 주기 위한

   var objVisible = tmpObj.style.display;

   // 초기화         
    document.getElementById("hdnAllValue").value = "";            
    var tblRowCnt = tmpObj.rows.length;
            
    for (var i = 1; i < tblRowCnt; i++) {
            document.getElementById("hdnAllValue").value +=

            document.getElementById("txtValue_" + i.toString()).value + "^";

    // 값 축적 ==> 
            }

   document.getElementById("hdnServerValue").value =

                                 document.getElementById("hdnAllValue").value;

    //

   if ("none" == objVisible) {
        tmpObj.style.display = "block";}
   else {  tmpObj.style.display = "none";}

   return false;
  }
</script>

 Repeater.aspx .cs

 protected void Page_Load(object sender, EventArgs e)
{
    if (!IsPostBack)
    {
        DataBindings();
    }

    // 값이 같게 나와야되요..!! 전 저장을 제때못해서..;; 같게나와야정상임.
    string tmp = Request["hdnAllValue"];

    //==> 
    string tmp_1 = hdnServerValue.Value;

    //==> 
}


posted by 방랑군 2012. 1. 8. 00:50

Repeater 바인딩 예제
 ==> 이 그림의 예제는 리피터 콘트롤 바인딩 예제로 준비 한 것입니다.^^

 RptTest_1.aspx : 코딩

 <%@ Page Language="C#" AutoEventWireup="true"

                         CodeFile="RptTest_1.aspx.cs" Inherits="RptTest_1" %>

  ........

 <html xmlns="http://www.w3.org/1999/xhtml">
 <head id="Head1" runat="server">
 </head>
 <body>
  <form id="form1" runat="server">
   <div>
    <asp:Repeater ID="Rpt_1" runat="server">
    <HeaderTemplate>
     <table id="tblObj" border="1px">
      <tr>
       <th>번호</th>
       <th>제목</th>
       <th>내용</th>
       <th>비고</th>
      </tr>
    </HeaderTemplate>
    <ItemTemplate>
     <tr> 
     <td style="text-align:center;"><%# PlusNum(Eval("SEQ"))%></td>
     <td><%# Eval("TITLE")%></td>
     <td><%# Eval("CONTENTS")%></td>
     <td> <input type="text" id="txtValue_<%# Eval("SEQ")%>"

                             name="txtValue_<%# Eval("SEQ")%>" size="30" />
     </td>
     </tr>
    </ItemTemplate>
    <FooterTemplate>
  </table>
    </FooterTemplate>
 </asp:Repeater>
 </div>
 </form>
 </body>
 </html>

 RptTest_1.aspx.cs : 코딩

 public partial class RptTest_1 : PageBase
 {
   protected void Page_Load(object sender, EventArgs e)
   {
     if (!IsPostBack)
     {
      DataBindings();
     }
   }

 private void DataBindings()
 {

   SqlConnection con = new SqlConnection(constr);
   con.Open();

   SqlCommand com = new SqlCommand();
   com.Connection = con;
   com.CommandType = CommandType.StoredProcedure;
   com.CommandText = "USP_TEST_BOARD";
   SqlDataAdapter ad = new SqlDataAdapter(com);
   DataSet ds = new DataSet("NOVITEST");
   ad.Fill(ds, "TEST_BOARD");

   DataTable dt = ds.Tables["TEST_BOARD"];
   int rowCnt = dt.Rows.Count;
   for (int i = 0; i < rowCnt; i++)
   {
    dt.Rows[i]["TITLE"] = TestMethod(dt.Rows[i]["TITLE"].ToString());
   }

    this.Rpt_1.DataSource = dt;
    this.Rpt_1.DataBind();

    con.Close();
  }

  private string TestMethod(object strObj)
  {
    return strObj.ToString() + " - New Add Test String";
  }

  public string PlusNum(object objTmp)
  {
    return (Convert.ToInt32(objTmp) + 100).ToString();
  }
}

예제 설명

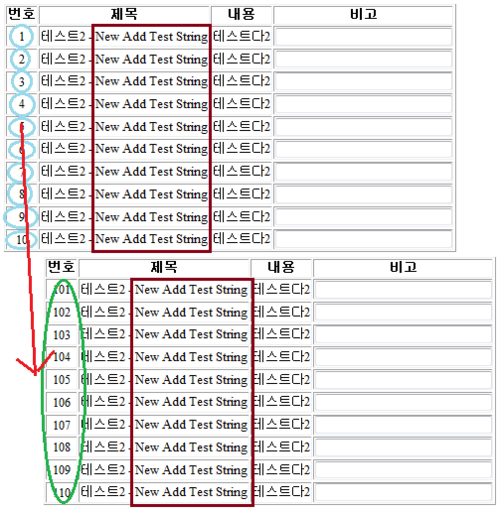
 1] <%# PlusNum(Eval("SEQ"))%> ==> 함수를 만들어서 바인딩한 예제

 2] id="txtValue_<%# Eval("SEQ")%>" 이런식으로 각 고유 아이디 가능 하다

 3] private string TestMethod(object strObj) ==> 코드 안딴에서 함수 처리

 ※ 참고

 DataSource에 배열을 바인딩 할 경우
  ==> <%# Container.DataItem %>

posted by 방랑군 2012. 1. 8. 00:49

리피터 컨트롤

 1] 데이터를 반복해서 보여주는 컨트롤

 2] 템플릿을 통해 행에 보여줄 형식을 지정

 템플릿 종류

 ItemTemplate

  - 데이터 항목을 보여줄 템플릿

  - 반드시 정의^^

 AlternatingItemtemplate

  - 열을 변경하면서 열의 색깔을 다르케 나오케 한다던가....

  - 반드시 지정 - X

 HeaderTemplate

  - 말그대로 머리 / 제목 부분

 FooterTemlate

  - 데이터 항목 리스트를 다 보여준 후에 보여질 것들 표시

  - 바닥영역

 SeparatorTemplate

  - 데이터 항목과 항목 사이에 보여줄 분리 템플릿

 기본 리피터 정의 형식

 <asp:Repeater ID="Rpt_1" runat="server">
  <HeaderTemplate>
   <table id="tblObj" border="1px" style="display:none;">
    <tr>
     <th>번호</th>
     <th>제목</th>
     <th>내용</th>
     <th>비고</th>
     </tr>
  </HeaderTemplate>
  <ItemTemplate>

   <%# Eval("CONTENTS")%>

  </ItemTemplate>

 sqlDataSource를 이용한 간단한 예제

 <asp:Repeater ID="rpt1" runat="server" DataSourceID="sql1">
 <HeaderTemplate>
 <table border="1px">
 <tr>
    <th>제목</th>
    <th>내용</th>
    <th>글쓴이</th>
    <th>기타</th>
    <th>글번호</th>
    <th>수정날</th>
 </tr>
 </HeaderTemplate>
 <ItemTemplate>
  <tr>
    <td><%# Eval("TITLE")%></td>
    <td><%# Eval("CONTENTS")%></td>
    <td><%# Eval("WRITE_DT")%></td>
    <td><%# Eval("ETC")%></td>
    <td><%# Eval("SEQ")%></td>
    <td><%# Eval("MODI_DT")%></td>
  </tr>
 </ItemTemplate>
 </asp:Repeater>
 <asp:SqlDataSource ID="sql" runat="server" 
    ConnectionString="<%$ ConnectionStrings:TIS %>" 
    SelectCommand="SELECT [SEQ], [TITLE], [CONTENTS],

                    [WRITE_DT], [MODI_DT], [ETC] FROM [TEST_BOARD]">
 </asp:SqlDataSource>

posted by 방랑군 2012. 1. 8. 00:46

출처 :  http://blog.naver.com/guruby?Redirect=Log&logNo=140031649144 

 이 글은 ASP.NET 개발을 책임지고 있는 Scott Guthrie의 블로그에서 가져온 글입니다.

원문은 http://weblogs.asp.net/scottgu/archive/2006/11/28/tip-trick-implement-donut-caching-with-the-asp-net-2-0-output-cache-substitution-feature.aspx에서 보실 수 있습니다.


이번 글은 좀 길어서 제대로 번역했는 지 의심스럽기도 합니다..
"번역은 반역이다"라는 말을 실감하고 있습니다..


-------------------------------------------------------------------------------


도넛 캐싱 구현 - ASP.NET 2.0 Output Cache Substitution


약간의 배경지식:
ASP.NET에서 매우 강력하지만 아직은 덜 사용되고 있는 것 중의 하나로 캐싱이 있다.
ASP.NET 캐싱 기능은 반복적인 사용자 요청에 대해 반복적으로 수행되는 것을 피할 수 있게 한다.
일단 한번 html 내용이나 data를 만들고 나서는 작업 결과를 저장해 놓았다가 재사용한다.
이것은 애플리케이션의 성능을 드라마틱하게 향상시킬 수 있다.
그리고 데이터베이스같은 중요한 자원의 부담을 줄일 수 있다.


Steve Smith는 ASP.NET 1.1에서의 캐싱에 대해 몇년 전 MSDN에 좋은 기사를 썼다.
그 기사는 ASP.NET 1.1 캐싱 기능의 몇가지 기본 사항과 사용방법에 대한 글이다.
만일 ASP.NET 캐싱 기능을 전에 사용해본 적이 없다면, 한번 시도해 볼 것을 권한다.
ASP.NET 2.0은 캐싱에 두가지 매우 중요한 기능을 추가했다.


1) SQL 캐쉬 무효화 지원 (SQL Cache Invalidation Support)
이것은 데이터베이스의 테이블이나 로우가 수정되면 자동적으로 캐쉬가 무효화되게 한다.
예를 들어 전자상거래 사이트의 제품 목록 페이지가 캐쉬되고 있는 상태에서
언제라도 가격을 바꾸면 바로 반영된다. (옛날 가격을 보여주지 않는다)


2) 출력 캐쉬 대체 (Output Cache Substitution)
내가 "도넛 캐싱"이라고 부르는 이 재치있는 기능은 출력 캐쉬된 페이지에서 일부분만 변하게 할 수 있다.
이것은 전체 페이지 출력 캐싱을 좀더 적극적으로 사용할 수 있게 한다.
부분 캐싱을 위해서 페이지를 여러개의 .ascx 사용자 컨트롤로 나눌 필요가 없다.
아래 팁은 이 기능을 만들게 된 동기와 구현 방법에 대해 설명한다.


실제 세계에서의 시나리오:

정해진 제품 카테고리로부터 제품 목록을 보여주는 페이지를 만들고자 한다.
제품목록 페이지인 Products.aspx 에는 <asp:datalist> 컨트롤이 있는데

middle-tier의 product data에 바인딩되어 있다.
이 페이지를 출력 캐쉬하면 매번 같은 요청에 대해 데이터베이스를 사용하지 않을 수 있다.
구현은 쉽다. 그저 페이지 맨위에 <%@ OutputCache %> 지시를 추가하면 된다.


아래 페이지에서 출력 캐쉬가 어떻게 설정되어 있는 지 보라.
100,000초 동안 캐쉬되고 있다가 northwind의 제품테이블이 수정되면 다음 요청부터 페이지가 즉시 갱신된다.
출력캐쉬 지시에 "VaryByParam" 속성이 있다. 이것은 ASP.NET이 categoryID별로 페이지를 따로 캐쉬하게 한다.
(예를 들어 Products.aspx?categoryId=1과 Products.aspx=2는 따로 저장된다.)


Products.aspx:


<%@ Page Language="VB" MasterPageFile="~/Site.master" AutoEventWireup="false" CodeFile="Products.aspx.vb" Inherits="Products" %>
<%@ OutputCache Duration="100000" VaryByParam="CategoryID" SqlDependency="northwind:products" %>


<asp:Content ID="Content1" ContentPlaceHolderID="ContentPlaceHolder1" Runat="Server">
<div class="catalogue">
    <asp:DataList ID="DataList1" RepeatColumns="2" runat="server">
        <ItemTemplate>
            <div class="productimage">
                <img src="images/productimage.gif" />
            </div>
            <div class="productdetails">
            
                <div class="ProductListHead">
                    <%#Eval("ProductName")%>
                </div>
                
                <span class="ProductListItem">
                    <strong>Price:</strong>
                    <%# Eval("UnitPrice", "{0:c}") %>
                </span>
            </div>
        </ItemTemplate>
    </asp:DataList>
    <h3>Generated @ <%=Now.ToLongTimeString()%></h3>
</div>
</asp:Content>


Products.aspx.vb:


Partial Class Products
    Inherits System.Web.UI.Page

    Sub Page_Load(ByVal sender As Object, ByVal e As System.EventArgs) Handles Me.Load

        Dim products As New NorthwindTableAdapters.ProductsTableAdapter

        DataList1.DataSource = products.GetProductsByCategoryID(Request.QueryString("categoryId"))
        DataList1.DataBind()

    End Sub

End Class


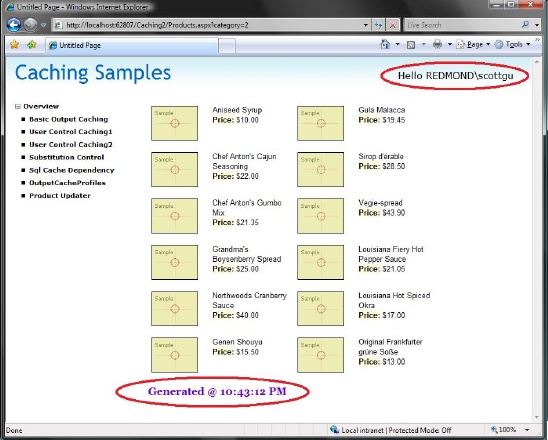
브라우저에서 접근하면 아래와 같이 보인다.


아래쪽의 timestamp를 주의깊게 봐라.
이 timestamp는 100,000초가 지나거나 product 테이블의 데이터가 수정되면 바뀐다.
이 페이지는 모든 HTTP 요청에 대해 캐쉬된 것을 보여준다.
이 방법은 서버가 초당 1000여번의 요청 처리를 가능하게 하고 데이터베이스는 사용하지 않게 한다.
(그래서 무지하게 빠르다)


문제점:

위 예제의 한가지 문제점은 환영 메시지와 사용자 이름에서 발생한다. (위쪽 빨간 동그라미 참조)
이것은 ASP.NET 2.0 <asp:loginname> 컨트롤을 사용해서 Site.Master 페이지에서 생성되는 메시지이다.


<div class="header">
    <h1>Caching Samples</h1>
            
    <div class="loginstatus">
        <asp:LoginName FormatString="Welcome {0}!" runat="server" />
    </div>        
</div>


문제는 전체 페이지를 캐쉬하기 때문에 발생한다.
이 페이지에 접근하는 첫번째 사용자의 이름이 캐쉬되어서 다른 사용자에게 잘못된 환영 메세지를 보여주게 된다.
(이건 더 안좋은 상황이다..)


해결책:


이 방법을 해결하는데 두가지 방법이 있다.


첫번째 방법은 페이지를 전면 개편해서 사용자 컨트롤로 도배하는 것이다.
캐쉬될 필요가 있는 내용을 사용자 컨트롤 안에 넣고

각 .ascx 사용자 컨트롤의 맨 위에 <%@ OutputCache %>을 추가한다.
이 방법 역시 매번 데이터베이스에 접근하는 것을 피하고 사용자 이름도 정확하게 나오도록 한다.
이것은 ASP.NET 1.1에서 사용하는 방법인데 당연히 ASP.NET 2.0에서도 된다.


출력 캐쉬 대체 블럭 - <asp:substitution> 컨트롤 사용:
출력 캐쉬 대체 블럭은 전체가 캐쉬된 페이지에서 변경될 수 있는 부분을 표시할 수 있게 한다.
(예를 들면 위의 예제에서 사용자 이름이 그렇다)
나는 때때로 이것을 "도넛 캐싱 기능"이라고 부른다.
왜냐하면 페이지의 바깥 부분은 캐쉬되고 안쪽의 몇몇 구멍이 동적으로 변하기 때문이다.

이것은 사용자 컨트롤을 사용한 페이지 부분 캐쉬와 정확히 반대되는 개념이다.
페이지 부분 캐쉬는 페이지 전체가 동적으로 변하고 일부분이 캐쉬된다.

출력 캐쉬 대체는 (정확히 위의 Products.aspx 예에서 처럼) 페이지 전체를 출력 캐쉬해서 구현할 수 있다.
페이지 중에서 동적으로 변경되는 부분만 <asp:substitution> 컨트롤로 표시하면 된다.


<div class="header">
    <h1>Caching Samples</h1>
    
    <div class="loginstatus">
        <asp:Substitution ID="Substitution1" runat="server" MethodName="LoginText" />
    </div>
</div>


예를 들어 위 시나리오에서 환영 메세지를 동적으로 만들고 싶다면,
아래 메서드를  Site.Master 코드 비하인드 파일에 넣고 부르면 된다.


Partial Class Site
    Inherits System.Web.UI.MasterPage

    Shared Function LoginText(ByVal Context As HttpContext) As String
        Return "Hello " & Context.User.Identity.Name
    End Function

End Class


이제 전체 페이지 중에서 <asp:substitution> 컨트롤 부분만 빼고 출력 캐쉬되었다.

만일 쇼핑 카트같은 추가적인 개인 정보를 넣고 싶다면 당연히 그럴 수 있다.
좋은 점은 페이지의 다른 부분은 모두 캐쉬되었서 페이지를 생성하기 위해서
더이상 데이터베이스에 접근하지 않아도 된다는 것이다.
(이것이 의미하는 것은 한대의 서버로도 초당  수천번의 페이지 요청을 처리할 수 있다는 것이다)

사실은 요청을 처리하는 동안 어떠한 컨트롤도 생성되지 않는다. 단지 위의 static 메서드만 불린다.
그래서 모든 것이 무지 빠르다..


출력 캐쉬 대체 블럭 - Response.WriteSubstitution 메서드를 사용:

<asp:substitution>로 바뀌는 부분을 표시하는 방법 외에도 Response.WriteSubstitution를 사용하는 방법도 있다.

이 메서드는 HttpResponseSubstitutionCallback 위임 개체를 전달인자로 가진다.
그래서 애플리케이션 어디에서나 구현 가능하다.

(code-behind 클래스의 static 메서드에서 가능한 것이 아니다)

<asp:substitution> 도 내부적으로는 이 메서드를 사용해서 code-behind 클래스의 delegate와 연결한다.
같은 방법으로 당신의 사용자 컨트롤이나 페이지에서 사용할 수 있다.


결론:

아직도 캐쉬기능을 사용하지 않는 ASP.NET 애플리케이션을 발견하고 있다.
ASP.NET은 전체 페이지 출력 캐쉬, 페이지 부분 출력 캐쉬, 그리고 이제는 "도넛 캐싱"을 지원한다.
이것은 파라미터나 로직에 따라 캐쉬된 내용이 바뀔 수 있고 데이터베이스가 바뀌면 자동으로 내용을 갱신하게 한다.
일정 수준 이상의 애플리케이션이라면 캐쉬를 사용하지 않는 애플리케이션을 찾기 힘들 것이다.


나는 강력히 모든 ASP.NET의 캐쉬 기능을 알아 볼 것을 권한다.
다른 캐쉬 사용 예를 보기 원한다면 내 Tips/Tricks talk from the recent ASP.NET Connections event을

다운로드하길 바란다.
이 발표에서 나는 어떻게 전체 페이지 캐싱, 페이지 부분 캐싱, 대체 블럭 캐싱, SQL 캐쉬 무효화를 하는지 보여준다.
그리고 추가적인 ASP.NET 팁들 보려면 내 ASP.NET Tips, Tricks and Resources page를 보기 바란다.


이 글이 도움이 되기를
Scott

'PP > ASP.NET' 카테고리의 다른 글

[ASP.NET] Repeater(리피터) 2  (0) 2012.01.08
[ASP.NET] Repeater(리피터) 1  (0) 2012.01.08
[캐싱] Caching Process  (0) 2012.01.08
[캐싱] ASP.NET 캐싱 기능을 살펴보자.  (0) 2012.01.08
[캐싱] 웹사이트 캐싱전략  (0) 2012.01.08
posted by 방랑군 2012. 1. 8. 00:44

출처 : http://blog.naver.com/jeeh001?Redirect=Log&logNo=90117520240 

1. 캐싱(Caching) ?

  : 이미 처리된 데이터를  캐시에 넣는 행위를 말한다.


    (1) 캐싱기능

       ㄱ. 출력캐싱 - 페이지 처리 결과를 출력 캐시에 저장하고 사용자가 페이지를 다시 요청할때

                           페이지를 다시 처리하는 대신 출력 캐시에 저장된 결과를 다시 사용하는 캐싱기법

           - 출력캐싱기법 

              a. 전체페이지 캐싱 - 페이지 전체를 캐싱하는 기법 

                        <%@ OutputCache Duration="10" VaryByParam="none"&>

                         => .aspx 페이지를 10초간 출력 캐시에 저장하며, 매개변수를 통한 출력캐시는

                              사용하지 않겠다

                   @ OutputCache :  Duration, VaryByParam 특성을 지정해 줘야 한다.


              b. 부분페이지 캐싱 - 페이지의 일부분을 캐싱하는 기법


         ㄴ. 데이터 캐싱 - 사용자가 생성한 데이터 자체를 저장하는 캐싱기법

                               - 응용 프로그램 캐싱이라고도 한다.


    (2) 캐싱이 일어나는 순서

      1. .asp페이지를 최초로 요청하면 파서에 의해 .asp 페이지 구분을 분석하는 파싱 작업이

           일어난다.            

      2. 중간언어(IL)로 만드는 컴파일 작업이 일어난다.

      3. 생성된 중간언어는 어셈블리 캐시에 저장되고  메모리가 올려진 중간언어는 CLR에 의해

          실행된후 그 결과가 사용자에게 웹 페이지 형식으로 렌더링된다.


2. 캐시

  : 문맥상 명사(저장소) 또는 동사(저장하다)의 형태로 사용될수 있으므로 상황에 따라 캐싱과 동일한

    의미를 가진다.

  : 빠른 데이터 처리를 위해 이미 처리된 데이터를 임시적으로 저장해 두는 장소를 말한다.


[출처] ASP.NET - 캐싱(Caching)|작성자 수빈이

 
posted by 방랑군 2012. 1. 8. 00:43
출처 :  http://blog.naver.com/wml?Redirect=Log&logNo=100003581528 

고성능을 빌드하는 데 가장 중요한 요소 중 하나는 데이터 개체, 페이지, 페이지 부분 등의 항목이 처음으로 요청될 때 확장 가능한 웹 응용 프로그램이 해당 항목을 메모리에 저장할 수 있어야 한다는 점입니다. 이러한 항목은 웹 서버나 요청 스트림의 다른 소프트웨어에 저장할 수 있습니다(예: 프록시 서버 또는 브라우저). 이 기능을 사용하면 이전 요청을 충족하는 정보, 특히 막대한 프로세서 시간을 소비하는 정보나 그 밖의 리소스를 만들 때 서버에서 이를 다시 만들지 않아도 됩니다. 캐싱이라고도 하는 이 기능을 사용하면 수많은 기술을 사용하여 HTTP 요청을 통해 페이지 출력이나 응용 프로그램 데이터를 저장했다가 다시 사용할 수 있습니다. 이로 인해 서버는 정보를 다시 만들지 않아도 되므로 시간과 리소스가 절약됩니다.


ASP.NET은 고성능 웹 응용 프로그램을 만드는 데 사용할 수 있는 두 가지 형식의 캐싱을 제공합니다. 첫째 형식은 출력 캐싱입니다. 이 형식에서는 동적 페이지 및 사용자 정의 컨트롤의 응답을 원래 서버에서 요청 브라우저로의 출력 스트림에 있는 HTTP 1.1 캐시 사용 장치에 저장할 수 있습니다. 이후 요청에 대해서는 이 페이지나 사용자 정의 컨트롤 코드가 실행되지 않고, 대신에 캐싱된 출력이 사용되어 요청을 충족시킵니다. 둘째 형식은 기존의 응용 프로그램 데이터 캐싱입니다. 이 캐싱을 사용하면 데이터 집합과 같은 임의의 개체를 서버 메모리에 체계적으로 저장하여 응용 프로그램이 이 개체를 다시 만드는 데 소요되는 시간 및 리소스를 절약할 수 있습니다.


posted by 방랑군 2012. 1. 8. 00:42

출처 :  http://blog.loveciel.kr/23 


 안녕하세요 ^^ 간만에 글을 쓰는 Ciel 입니다.

웹사이트를 구축하고 , 그 사이트를 서비스 하는데 있어서 가장 비용이 많이 드는 작업이 

바로 데이터 바인딩인데 , 반복적인 데이터 바인딩을 피해서, 더 적은 비용으로 

더 빠른 사이트를 운영하기 위해 사용하는 방법이 바로 웹사이트 캐싱입니다.

이번 시간에는 실무에서 사용되는 캐싱 기법중 몇가지를 소개하고자 합니다.


제가 이번에 소개해 드릴 캐싱 전략은 두가지로써, 둘다 실무에 빈번히 쓰이는 기법입니다.


좌측에 보이는 WebRequest는 대규모 사이트에 주로 적합한 방식이지만 , 빈번히 데이타의 내용이 바뀔때는 

그다지 효율적이지 않을수 있습니다.  그에 비해 Cache 를 이용하는방식은 간편하지만 ,  WebRequest 방식보다는

다소 비용이 더 소비 됩니다. 이 두가지 기법을 소개하고 , 두가지의 장단점을 살펴보도록 하겠습니다.


1.WebRequest Stream 을 이용한 캐싱 


첫번째로 소개해 드릴 기법은 WebRequest 객체를 사용해서 캐싱을 구현하는 기법입니다.

이 기법은 데이터 바인딩이 된 페이지의 html 파일을 저장하고 , 기본 호출시에 , 저장된 html 파일을 출력함으로써 , 

반복적인 데이터 바인딩을 피하는 기법입니다.

이 기법은 주로 자료의 양이 많은 포털 사이트등의 메인 페이지에서 널리 사용됩니다.

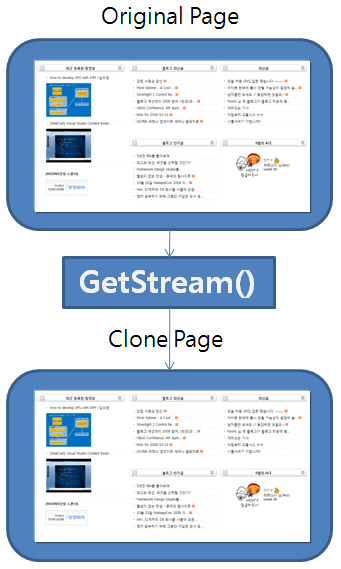
이 기법을 도식화 하면 다음과 같습니다. 

WebRequest 객체는 HttpRequest 를 수행할 객체를 생성합니다.

그후, 이 객체를 HttpResponse 객체를 이용해 HttpRequest 가 수행된 리턴값을 받아 옵니다.

즉 , Http 통신을 객체를 이용하여 내부적으로 행하는것인데 , 이 방법을 통해서 , 

결과 페이지 Html 을 GetResponseStream()으로 받아와서 저장하면, 모든 준비가 끝난겁니다.^^

다음번 호출부터는 저장된 페이지를 호출함으로써 , 데이터 바인딩을 행하지 않는 완벽한 클론 페이지를 만들수 있게 되는것이죠.

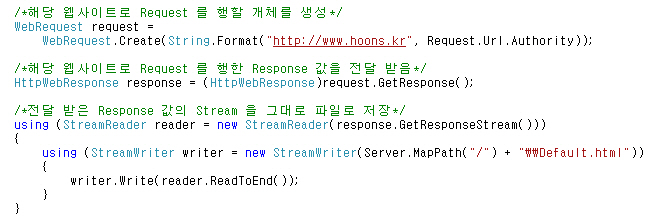
다음은 구현 부분입니다.

설명은 좀 길고 어떻게 보면 난해할수도 있는데(OTL) 코드는 허무하리라 만큼 간단합니다 ^^


1. Request 객체 생성 
2. 생성된 객체로 호출한 결과값 전달받음 
3. 전달받은 객체의 Stream 을 저장


3단계만 기억하면 간단합니다.

그러나 이 기법도 단점이 존재합니다. 웹사이트를 통째로 저장하기 때문에 , ViewState 의 변경상태를 저장하기가 힘들고, 

이는 ASP.NET 의 최대 장점인 ViewState 를 사용하기 힘들다는 헛점으로 이어지게 됩니다.

또,파일 핸들링 자체가 어느정도 비용이 큰 작업이기 때문에 빈번히 파일을 쓸수 없고 , 

이는 일반 게시판 같이 빈번하게 바뀌는 게시물에 대응하기가 힘들다는 단점으로 요약될수 있습니다.

그렇기 때문에 이 기법은, 사용자 게시물이 메인 페이지에 없고  운영자의 취향대로 대문 페이지를 구성해야 하는 

대형 서비스 사이트에 어울리는 기법이라고 할수 있겠습니다.


2. HttpRuntime.Cache


두번째 소개해드릴 기법은 ASP.NET개발을 해보셨다면 누구나 들어보셨을만한 기법인 HttpRuntime.Cache 입니다.

이 객체는 어떠한 닷넷 객체도 캐싱이 가능함으로써 , 상당한 유연함을 지니고 있습니다. 

사용방법도 아주 간단하죠. 그러나 서버자원을 계속해서 사용함으로써, 어느정도 메모리를 

지속적으로 점유해야 하는 리스크를 안고 있습니다.

이 객체를 사용하기에 적합한 예는 , 호출이 빈번하며 , 데이터의 내용이 잘 바뀌지 않는 경우 입니다. 

그리고 만료 시간을 정해줌으로써, 주기적으로 데이터를 가져오거나 , CacheDependency 를 이용해서 Cache를 

Runtime 시에 컨트롤 할수 있습니다. 


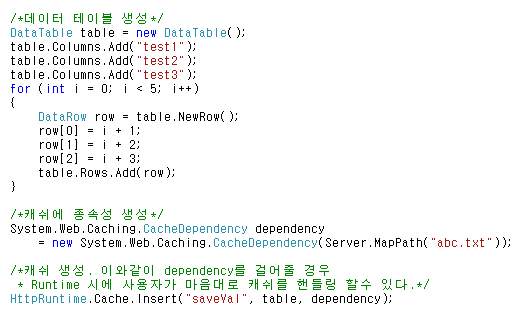
다음 코드는 Cache를 이용해서 데이터 테이블을 바인딩 하는 예제를 보여줍니다.


위와 같이 캐쉬를 설정하고 , 캐쉬디펜던시를 설정하게 되면 , 캐쉬디펜던시에 따라서 , 캐쉬가 삭제되게 됩니다.


캐쉬의 장점은 닷넷의 어떠한 객체도 캐싱이 가능하다는점입니다. 

그러나 서버의 리소스를 계속해서 점유하게 되고 , 서비스를 하는 사람 입장에서 , 

이 캐쉬를 지우는것외에 변조가 힘들게 됨으로써 , 이전에 보여드린 WebRequest방식보다는 

다소 유연함이 떨어진다고도 할수 있겠습니다.


마무리.

서비스 하는 사이트가 커짐에 따라 신경써야 할 부분도 많아지고 , 

웹서버의 한계를 극복하기 위한 여러 기법들도 점차로 발전하고 있는 지금 , 

이번에 소개해드린  캐싱 전략은 현재 서비스 하는 사이트의 유지비용을 줄여주는데 

어느정도 힌트가 되어줄수 있다고 생각합니다.

두가지 캐싱기법에 대해 잘 숙지하시고 적재적소에 활용하신다면

사이트 유지에 있어서 큰 이득을 보실수 있을거 같습니다. ^^


posted by 방랑군 2012. 1. 8. 00:38

출처 :  http://weblab.tistory.com/218 

웹페이지 전체 혹은 일부 페이지 내에 쓰이는 데이터의 캐싱은 가상화와 더불어 비싼 서버자원을 효율적으로 사용하기 위한 훌륭한 방법 중 하나입니다.

그래서 이번에 살펴보고 적용한 코드를 메모해두려고 합니다.

ASP.NET에서 캐싱은 크게 세 가지 방식으로 나눠집니다.
  1. 페이지 단위 캐싱
    - 페이지에 세션값에 따른 분기가 있다면 캐싱된 데이터가 그대로 뿌려지므로 동작하지 못합니다.
  2. 데이터 단위 캐싱
    - 고정적으로 출력할 데이터만 콜렉션에 관리하므로 세션값이나 기타 파라미터에 따라 페이지 내 동적인 요소를 관리할 수 있습니다.
  3. 컨트롤 단위 캐싱
    - 사용자가 작성한 컨트롤 단위로 캐싱을 선언할 수 있습니다.
먼저 페이지 단위 캐싱은 누가 접속하더라도 동일한 출력물을 표시할 때 유용합니다.

<%@ OutputCache Duration="60" VaryByParam="None" %>

요렇게 선언적으로 프로그래밍하시거나

Response.Cache.SetExpires(DateTime.Now.AddSeconds(60));
Response.Cache.SetCacheability(HttpCacheability.Public);
Response.Cache.SetValidUntilExpires(true);

요렇게 C# 코드로 작성하셔도 됩니다.

그리고 좀 더 자주 쓰지 않을까 싶은 데이터 단위 캐싱을 하려면 Context.Cache 객체에 의존해야 합니다.

//using System.Web.Caching

Cache cache = Context.Cache;
cache.Insert("Pls-Remember-Me", "캐시에 담을 객체 - 지금은 스트링", null, System.Web.Caching.Cache.NoAbsoluteExpiration, TimeSpan.FromHours(4));

이렇게 저장해두면 4시간 동안은 IIS가 데이터를 보관해둡니다.

(String)cache["Pls-Remember-Me"]

처럼 접근해서 데이터를 가져올 수 있습니다. 간편하죠? ^^a

사용자 정의 컨트롤의 경우 System.Web.UI.UserControl을 상속받았으면 [PartialCaching(120)]처럼 선언적 프로그래밍이 가능합니다만, 필요에 따라 골라 쓰시면 되겠습니다.

 
posted by 방랑군 2012. 1. 8. 00:34

출처 :  http://blog.naver.com/PostView.nhn?blogId=alfustnals&logNo=140143354888&categoryNo=0&parentCategoryNo=20&viewDate=&currentPage=1&postListTopCurrentPage=1&from=search

 데이터 캐싱을 하는 이유 

 프로젝트를 하면 캐싱을 사용하여 더 효율적으로 자원을 활용한다.

 캐싱은 웹페이지 전체 혹은 일부 페이지 내에 쓰이는데 가상화와 비싼 서버자원을

 효율적으로 사용을 위해 사용 한다.

 뭐 여튼 좋은것이다..;;;

 데이터 캐싱의 3가지 방법

 1] 페이지 단위 캐싱
 2] 데이터 단위 캐싱
   고정적으로 출력할 데이터만 컬렉션에서 관리

   : 세션값이나 기타 파라미터에 따라 페이지 내 동적인 요소를 관리할 수 있다.
 3] 컨트롤 단위 캐싱

 페이징 단위 캐싱 방법

 Response.Cache.SetExpires(DateTime.Now.AddSeconds(0));
 Response.Cache.SetCacheability(HttpCacheability.NoCache);
 Response.Cache.SetValidUntilExpires(true);
 프로젝트에서 이 세구문이 궁금해서 공부 한 것이다. 근데 위에 선언문에다...

 <%@ OutputCache Duration="60" VaryByParam="None" %>

 이런식으로 옆에다 붙여 놓아도 된다고 한다..;;

 데이터 단위 캐싱 방법

 Context.Cache.Insert("MyData", dataset의로도);

 cache.Insert(키,캐쉬에담을객체,의존성,시간);

 Context.Cache.Insert("key",ds);

 Cache.Insert("", ds, null, DateTime.Now.AddMinutes(10), Cache.NoSlidingExpiration);

  ==> 10분 동안 IIS가 데이터를 보관

  ==> (String)cache["키값"] 으로 값을 가져 올 수 있다

 Sliding Expiration -  명시된 기간만큼 접근하지 않으면 만료되어지게 하는 것

 null - 항목과 파일시스템 객체사이의 의존성에 따라...

 사용자 정의 컨트롤 캐싱 방법

 [PartialCaching(20)] : 이런식으로 선언하여 사용

 캐싱 사용 예제 : http://msdn.microsoft.com/ko-kr/

 [PartialCaching(20)]
 public partial class ctlMine : UserControl
{
 protected void Page_Load(Object Src, EventArgs E)
 {
  DataSet ds = new DataSet();
  FileStream fs = new FileStream(Server.MapPath("schemadata.xml"),

                                                    FileMode.Open, FileAccess.Read);
  StreamReader reader = new StreamReader(fs);
  ds.ReadXml(reader);
  fs.Close();

  DataView Source = new DataView(ds.Tables[0]);
  LiteralControl myLiteral = new LiteralControl();
  myLiteral.Text = "<h6><font face=verdana>Caching an XML Table: " +

                                        Source.Table.TableName + " </font></h6>";
  MyDataGrid.DataSource = Source;
  MyDataGrid.DataBind();

  TimeMsg.Text = DateTime.Now.ToString("G");

 }
}

[출처] [ASP.NET] 데이터 캐싱 - Response.Cache.XXX|작성자 도망노비 

'PP > ASP.NET' 카테고리의 다른 글

[캐싱] 웹사이트 캐싱전략  (0) 2012.01.08
[캐싱] 데이터 캐싱 Tips - Context.Cache  (0) 2012.01.08
[asp.net] ashx 이미지 섬네일  (0) 2012.01.06
[asp.net] 이미지 섬네일  (0) 2012.01.06
C# 이미지 섬네일  (0) 2012.01.06
posted by 방랑군 2012. 1. 6. 23:22

출처 : http://infosearchshop.com/Content.aspx?id=7vWHuJea+Lw=&title=Making+thumbnail+dynamically+with+ashx+file+in+asp.net


In this article I am going to show how to resize image dynamically or making thumbnail dynamically with ashx file.Start new website project give name thumbnail.In menu go to Webite > Add new item and select Generic Handler. Name it Handler.ashx, You will get auto generated code in it like given below:

<%@ WebHandler Language="C#" Class="Handler" %>

using System;
using System.Web;

public class Handler : IHttpHandler {
    
    public void ProcessRequest (HttpContext context) {
        context.Response.ContentType = "text/plain";
        context.Response.Write("Hello World");
    }
 
    public bool IsReusable {
        get {
            return false;
        }
    }

}


Now add given namespace to handle the image files
using System.IO;
using System.Drawing;
using System.Drawing.Imaging;


Make a new folder for images files, name it images. Put some images in this folder.

Now our next step is getting the height , width , image name and changing image size.
 To do these things, here query string is used. In ProcessRequest method write follwing lines.


public class Handler : IHttpHandler {
    
    public void ProcessRequest (HttpContext context) {
 // for new height of image
  int h=int.Parse(context.Request.QueryString["h"].ToString()); 
 // for new width of image
        int w = int.Parse(context.Request.QueryString["w"].ToString());
         // for  image file name
        string file = context.Request.QueryString["file"].ToString();

 // Path of image folder where images files are placed
 string  filePath = context.Server.MapPath("~/images/" + file);

 // Resize proccess
   using(System.Drawing.Image img=System.Drawing.Image.FromFile(filePath))
    {
       Bitmap objBmp = new Bitmap(img,w, h);
        string extension = Path.GetExtension(filePath);
        MemoryStream ms; 
        byte[] bmpBytes;
        switch (extension.ToLower())
        {
            case ".jpg":
            case ".jpeg": 
                ms = new MemoryStream();
                objBmp.Save(ms, ImageFormat.Jpeg);
                bmpBytes = ms.GetBuffer();
                context.Response.ContentType = "image/jpeg";
                context.Response.BinaryWrite(bmpBytes);
                objBmp.Dispose();
                ms.Close();
                context.Response.End();
                break;
            case ".png":
                  ms = new MemoryStream();
                  objBmp.Save(ms, ImageFormat.Png);
                  bmpBytes = ms.GetBuffer();
                 context.Response.ContentType = "image/png";
                 context.Response.BinaryWrite(bmpBytes);
                 objBmp.Dispose();
                 ms.Close();
                 context.Response.End();
            break;
           case ".gif":
                ms = new MemoryStream();
                objBmp.Save(ms, ImageFormat.Gif);
                bmpBytes = ms.GetBuffer();
                context.Response.ContentType = "image/png";
                context.Response.BinaryWrite(bmpBytes);
                objBmp.Dispose();
                ms.Close();
                context.Response.End();
                break;
  
        }
        img.Dispose();
   }

    }


Now we move to Default.aspx page, drag here  Image tool from tool box :

    <asp:Image ID="img1" runat="server" /><br />
For retriving the image set ImageUrl as given below with height width and image name.

<asp:Image ID="img1" runat="server" ImageUrl="~/Handler.ashx?h=50&w=50&file=Winter.jpg" /><br />

And now finally run the default.aspx and see the result.

posted by 방랑군 2012. 1. 6. 23:21

출처 : http://www.west-wind.com/weblog/posts/283.aspx


One frequent task is to take images and convert them into thumbnails. This is certainly nothing new, but seeing this question is so frequently asked on newsgroups and message boards bears reviewing this topic here again.


I was getting tired of constantly repeating this code for specific situations, so I created a generic page in my apps to handle resizing images from the current site dynamically in a page called CreateThumbnail. You call this page with a relative image name from the Web site on the querystring and it returns the image as a thumbnail.


An example of how this might work looks like this:


http://www.west-wind.com/wwStore/demos/CreateThumbnail.aspx?image=images/WebStoreLogo_big.jpg&size=400


Size is an optional second parameter – it defaults to 120.


Here’s what the implementation of this generic page looks like:


using System.Drawing;

using System.Drawing.Imaging;


public class CreateThumbNail : System.Web.UI.Page

{

private void Page_Load(object sender, System.EventArgs e)

      {

            string Image = Request.QueryString["Image"];

            if (Image == null

            {

                  this.ErrorResult();

                  return;

            }


            string sSize = Request["Size"];

            int Size = 120;

            if (sSize != null)

                  Size = Int32.Parse(sSize);


            string Path = Server.MapPath(Request.ApplicationPath) + "\\" + Image;

            Bitmap bmp = CreateThumbnail(Path,Size,Size);


            if (bmp == null)

            {

                  this.ErrorResult();

                  return;

            }


            string OutputFilename = null;

            OutputFilename = Request.QueryString["OutputFilename"];


            if (OutputFilename != null)

            {

                  if (this.User.Identity.Name == ""

                  {

                        // *** Custom error display here

                        bmp.Dispose();

                        this.ErrorResult();

                  }

                  try

                  {

                        bmp.Save(OutputFilename);

                  }

                  catch(Exception ex)

                  {

                        bmp.Dispose();

                        this.ErrorResult();

                        return;

                  }

            }


            // Put user code to initialize the page here

            Response.ContentType = "image/jpeg";

            bmp.Save(Response.OutputStream,System.Drawing.Imaging.ImageFormat.Jpeg);

            bmp.Dispose();

      }


      private void ErrorResult()

      {

            Response.Clear();

            Response.StatusCode = 404;

            Response.End();

      }


      ///

      /// Creates a resized bitmap from an existing image on disk.

      /// Call Dispose on the returned Bitmap object

      ///

      ///

      ///

      ///

      /// Bitmap or null

      public static Bitmap CreateThumbnail(string lcFilename,int lnWidth, int lnHeight)

      {


            System.Drawing.Bitmap bmpOut = null;

            try

            {

                  Bitmap loBMP = new Bitmap(lcFilename);

                  ImageFormat loFormat = loBMP.RawFormat;


                  decimal lnRatio;

                  int lnNewWidth = 0;

                  int lnNewHeight = 0;


                  //*** If the image is smaller than a thumbnail just return it

                  if (loBMP.Width < lnWidth && loBMP.Height < lnHeight)

                        return loBMP;


                  if (loBMP.Width > loBMP.Height)

                  {

                        lnRatio = (decimal) lnWidth / loBMP.Width;

                        lnNewWidth = lnWidth;

                        decimal lnTemp = loBMP.Height * lnRatio;

                        lnNewHeight = (int)lnTemp;

                  }

                  else

                  {

                        lnRatio = (decimal) lnHeight / loBMP.Height;

                        lnNewHeight = lnHeight;

                        decimal lnTemp = loBMP.Width * lnRatio;

                        lnNewWidth = (int) lnTemp;

                  }


                  // System.Drawing.Image imgOut =

                  //      loBMP.GetThumbnailImage(lnNewWidth,lnNewHeight,

                  //                              null,IntPtr.Zero);


                  // *** This code creates cleaner (though bigger) thumbnails and properly

                  // *** and handles GIF files better by generating a white background for

                  // *** transparent images (as opposed to black)

                  bmpOut = new Bitmap(lnNewWidth, lnNewHeight);

                  Graphics g = Graphics.FromImage(bmpOut);

                  g.InterpolationMode = System.Drawing.Drawing2D.InterpolationMode.HighQualityBicubic;

                  g.FillRectangle( Brushes.White,0,0,lnNewWidth,lnNewHeight);

                  g.DrawImage(loBMP,0,0,lnNewWidth,lnNewHeight);


                  loBMP.Dispose();

            }

            catch

            {

                  return null;

            }


            return bmpOut;

      }


}


This code doesn’t use the CreateThumbnail method of GDI+ because it doesn’t properly convert transparent GIF images as it draws the background color black. The code above compensates for this by first drawing the canvas white then loading the GIF image on top of it. Transparency is lost – unfortunately GDI+ does not handle transparency automatically and keeping Transparency intact requires manipulating the palette of the image which is beyond this demonstration.


The Bitmap object is returned as the result. You can choose what to do with this object. In this example it’s directly streamed in the ASP. Net Output stream by default. If you specify another query string value of OutputFilename you can also force the file to be written to disk *if* you are logged in. This is definitely not something that you want to allow just ANY user access to as anything that writes to disk is potentially dangerous in terms of overloading your disk space. Writing files out in this fashion also requires that the ASPNET or NETWORK SERVICE or whatever account the ASP. Net app runs under has rights to write the file in the specified directory. I’ve provided this here as an example, but it’s probably best to stick file output functionality into some other more isolated component or page that is more secure.


Notice also that all errors return a 404 file not found error. This is so that images act on failure just as if an image file is not available which gives the browser an X’d out image to display. Realistically this doesn’t matter – browsers display the X anyway even if you send back an HTML error message, but this is the expected response the browser would expect.


In my West Wind Web Store I have several admin routines that allow to resize images on the fly and display them in a preview window. It’s nice to preview them before writing them out to disk optionally. You can also do this live in an application *if* the number of images isn’t very large and you’re not pushing your server to its limits already. Image creation on the fly is always slower than static images on disk. However, ASP. Net can be pretty damn efficient using Caching and this scenario is made for it. You can specify:

<%@ OutputCache duration="10000" varybyparam="Image;Size" %>


in the ASPX page to force images to cache once they’ve been generated. This will work well, but keep in mind that bitmap images can be memory intensive and caching them can add up quickly especially if you have large numbers of them.


If you create images dynamically frequently you might also consider using an HTTP Handler to perform this task since raw Handlers have less overhead than the ASP.Net Page handler. For example, the Whidbey Dynamic Image control relies on an internal handler that provides image presentation 'dynamically' without having to save files to disk first.

posted by 방랑군 2012. 1. 6. 23:21

출처 : http://ryunad.tistory.com/tag/C%23%20%EC%9D%B4%EB%AF%B8%EC%A7%80%20%EC%8D%B8%EB%84%A4%EC%9D%BC


간단하게 이미지를 하나 선택하면 선택한 이미지의 Thumbnail을 만드는 로직입니다.

윈 폼으로 만들었지만 로직부분만 재활용하면 ASP.NET이든 WPF든 어디서든 사용이 가능합니다.


using System; 
using System.Collections.Generic; 
using System.ComponentModel; 
using System.Data; 
using System.Drawing; 
using System.Linq; 
using System.Text; 
using System.Windows.Forms; 
using System.Runtime.Serialization.Formatters.Binary;

using System.IO;

namespace Ex11 

    public partial class MainForm : Form 
    { 
        private Person _person = new Person();

        public MainForm() 
        { 
            InitializeComponent(); 
        }

        private void btnLoadPicture_Click(object sender, EventArgs e) 
        { 
            //1. 파일 불러오기 
            OpenFileDialog dlg = new OpenFileDialog(); 
            if (DialogResult.OK == dlg.ShowDialog()) 
            { 
                string path = Application.StartupPath;

                string fileName = 
                    dlg.FileName.Substring( 
                    dlg.FileName.LastIndexOf("\\") + 1); 
                string filePath = 
                    Path.Combine(path, fileName); 
                int dotPosition = fileName.LastIndexOf("."); 
                string thumbnailName = 
                    fileName.Substring(0, dotPosition) + 
                    "_small" + 
                    fileName.Substring(dotPosition); 
                string thumbnailPath = 
                    Path.Combine(path, thumbnailName); 
                if (File.Exists(filePath)) 
                    File.Delete(filePath); 
                //2. 원본이미지 복사 및 thumbnail 이미지 생성 
                File.Copy(dlg.FileName, filePath); 
                Image image = 
                    Image.FromFile(filePath); 
                Image thumbnail = 
                    image.GetThumbnailImage(150, 150, null, IntPtr.Zero); 
                //picture 이미지 해제 
                if (pbPicture.Image != null) 
                { 
                    pbPicture.Image.Dispose(); 
                } 
                if (File.Exists(thumbnailPath)) 
                    File.Delete(thumbnailPath); 
                thumbnail.Save(thumbnailPath);

                //이미지 객체의 해제 
                image.Dispose(); 
                thumbnail.Dispose(); 
                //3. 이미지 표시 
                pbPicture.Image = 
                    Image.FromFile(thumbnailPath);

                _person.ImagePath = fileName; 
            } 
        }

        private void miSave_Click(object sender, EventArgs e) 
        { 
            _person.Name = txtName.Text; 
            _person.ResidentNumbers = txtResidentNumber.Text; 
            _person.BirthDate = DateTime.Parse(txtBirthDate.Text); 
            _person.Height = int.Parse(txtHeight.Text); 
            _person.Weight = int.Parse(txtWeight.Text); 
            _person.Phone = txtPhone.Text; 
            _person.Email = txtEmail.Text;

            string path = Path.Combine(Application.StartupPath, "person.dat"); ; 
            FileStream stream = new FileStream(path, FileMode.Create); 
            BinaryFormatter formatter = new BinaryFormatter(); 
            formatter.Serialize(stream, _person); 
            stream.Close();

            MessageBox.Show("저장되었습니다."); 
        }

        private void miOpen_Click(object sender, EventArgs e) 
        { 
        }

        private void MainForm_Load(object sender, EventArgs e) 
        { 
            string path = Path.Combine(Application.StartupPath,"person.dat"); 
            if (File.Exists(path)) 
            { 
                FileStream stream = new FileStream(path, FileMode.Open); 
                BinaryFormatter formatter = new BinaryFormatter(); 
                _person = (Person)formatter.Deserialize(stream); 
                txtName.Text = _person.Name; 
                txtResidentNumber.Text = _person.ResidentNumbers; 
                txtBirthDate.Text = _person.BirthDate.ToString("yyyy-MM-dd"); 
                txtHeight.Text = _person.Height.ToString(); 
                txtWeight.Text = _person.Weight.ToString(); 
                txtPhone.Text = _person.Phone; 
                txtEmail.Text = _person.Email;

                string fileName = _person.ImagePath; 
                fileName = fileName.Insert(fileName.LastIndexOf("."), "_small"); 
                string imagePath = Path.Combine(Application.StartupPath, fileName); 
                if (File.Exists(imagePath)) 
                { 
                    pbPicture.Image = Image.FromFile(imagePath); 
                } 
            } 
        } 
    } 
}

[출처] C# 이미지 섬네일|작성자 괴무리

'PP > ASP.NET' 카테고리의 다른 글

[asp.net] ashx 이미지 섬네일  (0) 2012.01.06
[asp.net] 이미지 섬네일  (0) 2012.01.06
[.ASHX 파일]jQuery 제너릭 처리기(ashx)로 DB/데이터배이스 받기/사용 핸들러/handler  (0) 2012.01.06
GENERIC  (0) 2012.01.04
Generic  (0) 2012.01.04
posted by 방랑군 2012. 1. 6. 23:20
출처 :   http://blog.yahoo.com/_SPX445PUEEEIIXT52JGVCSUPBQ/articles/503589 

Handler를 이용한 방법은 제가 자세한 원리는 잘 모르기 때문에 사용예제만 하나 올리겠습니다.

aspx페이지를 안만들고 ashx를 만들면 성능상 더 좋다고 합니다.

우선 ashx파일을 만듭니다.


넵 만들고 나면 기본적으로 이런코드만 나옵니다.
여기서 우선 알아두셔야할게 빨강 네모에 이 ashx파일이 내놓는 자료형식을 코드해주셔야 합니다.
저는 JSON형식을 사용하기 때문에 text/json으로 코드하겠습니다.
초록색 네모부분에는 출력할 결과문이 들어갈 자리입니다.


그런데 기본코드에서 빠진부분이 있습니다. 밑에 그림처럼 인코딩형식을 UTF8로 맞춰저야 합니다.
밑에 초록색은 안넣으셔도 상관없지만 보안상 넣어주시는게 좋다고 합니다.(정확히는 저도 잘 ^^;;)
여기까지가 밑준비 입니다.
원본 크기의 사진을 보려면 클릭하세요

이제 위쪽에 우리가 정말로 알고싶은 정보를 받아와서 JSON형식으로 바꿔주시면 됩니다.
그리고 다 바꾸고 나서는 꼭 Write메서드의 괄호안을 바꿔줍시다.
저는 다 알맞게 해놓고, 그부분을 빼먹어서 계속 Hello World가 나오더군요;;

원본 크기의 사진을 보려면 클릭하세요


넵 이걸로 ashx는 끝났습니다. 이제 받아서 사용하시기만 하면 됩니다.
jQuery에서 받아서 사용하는 방법은 예전에 올린 호스팅이랑 똑같습니다. 물론 불러올 페이지는 전에 aspx에서
이번에 만든 ashx파일경로로 바꿔주셔야 하죠 ^^


'PP > ASP.NET' 카테고리의 다른 글

[asp.net] ashx 이미지 섬네일  (0) 2012.01.06
[asp.net] 이미지 섬네일  (0) 2012.01.06
C# 이미지 섬네일  (0) 2012.01.06
GENERIC  (0) 2012.01.04
Generic  (0) 2012.01.04
posted by 방랑군 2012. 1. 4. 13:18

출처 : http://kimstar.pe.kr/blog/100?category=18

1) 박싱 & 언박싱
   - 값타입 --박싱--> 참조타입
   - 참조타입 --언박싱--> 값타입
  
  ArrayList al = new ArrayList();
  al.Add(100);                        // ArrayList는 object를 저장함. 따라서 100(값타입)은 참조타입으로 box되어 저장됨
  int val = (int)al[0];               // al[0]를 int(값타입)로 사용하기 위해 unboxing됨

2) 값타입
   - 단순타입 : int, byte, char, float, decimal, bool 등
  - 열거형타입 : enum
  - 구조체타입 : struct
  - nullable 타입 : int?, double? 등

3) 참조타입
  - 클래스 타입 : object, string, class
  - 인터페이스 타입 : interface
  - 배열타입 : Array(int[], int[,] 등)
  - 델리게이트 타입 : delegate

4) Generic
   - boxing, unboxing 에 사용되는 리소스 소비 해결
  - Generic에 사용되는 타입은 일반적으로 T로 명명

  List<int> list = new List<int>();  // int 타입을 제네릭 타입 파라메터로 지정
  list.Add(100);                     // int 데이타만 저장가능
  int val2 = list[0];                // int 타입이기에 형변환 필요없음

5) Generic 제한사항
   - 제네릭 적용 클래스는 ContextBoundObject 클래스로 파생될 수 없음 : 런타임 오류발생
  - 제네릭은 열거형에 사용못함
  - 제네릭은 Reflection을 이용해 생성되는 동적메소드에 사용못함.

6) Generic 제약사항
   - 제네릭이 클래스레벨에서 지정될때 where로 제약을 지정할 수 있음

7) .Net Framework에서 제공하는 Generic
   - Dictionary<TKey, TValue> : Hashtable의 제네릭 버전. Key & Value가 한쌍. Key는 유일
  - List<T> : ArrayList의 제네릭 버전. 배열의 크기를 동적으로 구성
   - SortedList<TKey, TValue> : Dictionary + List. Key & Value가 한쌍. 동적 배열. Key값으로 정렬됨.
  - LinkedList<T> : 새로생김.
  - Queue<T> : Queue의 제네릭 버전
  - Stack<T> : Stack의 제네릭 버전

타입 제네릭 비제네릭 제네릭 네임스페이스
클래스 List<T> ArrayList System.Collections.Generic
Dictonary<TKey, TValue> HashTable
SortedList<TKey, TValue> SortedList
Stack<T> Stack
Queue<T> Queue
LinkedList<T> -
ReadOnlyCollection<T> - System.Collections.ObjectModel
KeyedCollection<TKey, TValue> -
인터페이스 IList<T> IList System.Collections.Generic
IDictonary<TKey, TValue> IDictonary
ICollection<T> ICollection
IEumerator<T> IEumerator
IEumerable<T> IEumerable
IComparer<T> IComparer
IComparable<T> IComparable


001.using System;
002.using System.Collections;
003.using System.Collections.Generic;
004. 
005.namespace GenericTest
006.{
007.class Program
008.{
009.static void Main(string[] args)
010.{
011.// 박싱 & 언박싱------------------
012.// boxing & unboxing 발생함
013.ArrayList al = new ArrayList();
014.al.Add(1);                         // ArrayList는 object를 저장함. 따라서 100(값타입)은 참조타입으로 box되어 저장됨
015.intval = (int)al[0];              // al[0]를 int(값타입)로 사용하기 위해 unboxing됨
016.Console.WriteLine(val);
017. 
018.// boxing & unboxing 발생 안함
019.List<int> list = newList<int>();  // int 타입을 제네릭 타입 파라메터로 지정
020.list.Add(2);                       // int 데이타만 저장가능
021.int val2 = list[0];                // int 타입이기에 형변환 필요없음
022.Console.WriteLine(val2);
023. 
024. 
025.// 제네릭 선언------------------
026.// class를 제네릭으로 선언
027.GenericDeclare1<int> gd = new GenericDeclare1<int>();
028.gd.GenericProperty = 3;
029.Console.WriteLine(gd.GenericProperty);
030. 
031.// method를 제네릭으로 선언
032.GenericDeclare2 gd2 = new GenericDeclare2();
033.Console.WriteLine(gd2.GenericMethod<int>(4));
034. 
035. 
036.// class를 제네릭으로 선언 - where 제약------------------
037.//GC1<int> gc1 = new GC1<int>();  --> 오류발생 : int는 IDispose를 구현한 놈이 아님
038.GC1<TestGC1> gc1 = new GC1<TestGC1>();
039. 
040.//GC2<int, string> gc2 = new GC2<int, string>(); --> 오류발생 : int/string은 class/struct가 아님
041.GC2<TestGC2Class, TestGC2Strunct> gc2 = newGC2<TestGC2Class, TestGC2Strunct>();
042. 
043.//GC3<int> gc3 = new GC3<int>(); --> 오류발생 : int는 어쨓든 아님
044.//GC3<TestGC3_1> gc3 = new GC3<TestGC3_1>();  --> 오류발생 : TestGC3_1 은 IDispose를 구현했지만, 생성자에 파라메터가 있음
045.GC3<TestGC3_2> gc3 = new GC3<TestGC3_2>();
046. 
047.// TODO : 이거 잘 모르겠다.. 나중에 수정하자
048.GC4 gc4 = new GC4();
049.}
050.}
051. 
052. 
053. 
054.#region 테스트용 클래스들
055. 
056.class TestGC1 : IDisposable
057.{
058.public void Dispose()
059.{
060.}
061.}
062. 
063.class TestGC2Class
064.{
065.}
066. 
067.struct TestGC2Strunct
068.{
069.}
070. 
071.class TestGC3_1 : IDisposable
072.{
073.public TestGC3_1(int i)
074.{
075.}
076. 
077.public void Dispose()
078.{
079.}
080.}
081. 
082.class TestGC3_2 : IDisposable
083.{
084.public TestGC3_2()
085.{
086.}
087. 
088.public void Dispose()
089.{
090.}
091.}
092.#endregion
093. 
094. 
095. 
096./// <summary>
097./// class를 제네릭으로 선언
098./// </summary>
099.class GenericDeclare1<T1>
100.{
101.private T1 val;
102. 
103.public T1 GenericProperty
104.{
105.get { return val; }
106.set { this.val = value; }
107.}
108.}
109. 
110.class GenericDeclare2
111.{
112./// <summary>
113./// 메소드를 제네릭으로 선언
114./// </summary>
115.public T2 GenericMethod<T2>(T2 arg)
116.{
117.return arg;
118.}
119.}
120. 
121. 
122. 
123. 
124.#region Class를 제네릭으로 구현시 where로 제약하는 예제
125./// <summary>
126./// T는 IDisposable 인터페이스를 구현해야함
127./// </summary>
128.class GC1<T>
129.where T : IDisposable
130.{
131.}
132. 
133./// <summary>
134./// T는 클래스여야함
135./// U는 구조체여야함
136./// </summary>
137.class GC2<T, U>
138.where T : class
139.where U : struct
140.{
141.}
142. 
143./// <summary>
144./// T는 IComparable을 구현해야하고
145./// 파라메터가 없는 - "new()" - 기본 생성자를 가진 T 이다
146./// </summary>
147.class GC3<T>
148.where T : IDisposable, new()
149.{
150.}
151. 
152./// <summary>
153./// 델리게이트에 파라미터가 없는 - "new()" - 기본생성자를 가진 T
154./// </summary>
155.class GC4
156.{
157.delegate T GenericDelegate<T>(T val) where T : new();
158.//delegate int GenericDelegate2(int val);
159.}
160.#endregion
161.}

posted by 방랑군 2012. 1. 4. 02:45

출처 : http://blog.naver.com/saltynut/

Generic


드디어 C#과 VB.NET에 Generic이 적용되었습니다!  '드디어'라고 하니 마치 대단한 것처럼 생각이 되지만, 사실 C++ 프로그래머들이 템플릿 기능이 없다는 것으로 하도 난리법석(?)을 떤 탓에..

우선 Generic이 대체 어디에 쓰는 물건인지부터 알아봐야겠죠?

가장 간단하게, 유식하게 말하자면.. 'Type independent한 코드를 작성하게 해준다'라는 것입니다.

무슨 말인가 하면.. 통상 개발을 하다보면.. 특히 라이브러리 같은 것을 작성하다보면..

여러 타입을 지정할 수 있도록 필드, 파라미터, 리턴 타입 등을 object로 쓰는 경우가 많습니다.

예를 들면 다음과 같습니다.


using System.Collections;

 
// Employees 개체를 담을 Stack
Stack employees = new Stack();
// Push 메서드의 매개변수는 object 형이므로, 암시적 형 변환이 일어남
employees.Push( new Employee() );
// Pop 메서드의 리턴 타입은 object 형이므로, 명시적 형 변환을 해야 함
Employee employee = (Employee) employees.Pop();
 
뭐, 위 경우야 일단 별다른 문제가 있는 것은 아닙니다. 하지만 다음 코드는 좀 심각하지요.
 
// Integer를 담을 Stack
Stack sizes = new Stack();
// Box
sizes.Push( 42 );
// Unbox
int size1 = (int) sizes.Pop();
// Integer만 들어가야 하지만.. 어쨌든 컴파일 시는 OK
sizes.Push( 77 );
sizes.Push( new Employee() );
// 역시 컴파일은 되지만, Pop 시키는 것이 Employee 형일 경우..
// InvalidCastException이 발생한다.
int size2 = (int) sizes.Pop();
 
으음.. 이건 문제가 좀 있지요?
이런 경우에 발생가능한 문제점, 단점들에 대해서 정리해보자면..
* 컴파일 시에 타입 체킹이 불가능하므로, 임의의 타입을 집어넣어도 확인할 길이 없습니다.
* value type을 사용할 때, 박싱, 언박싱이 일어납니다.
* ref type일 때도, 런타임 타입 체킹이 계속 일어나며, 형 변환이 필요하므로 오버헤드가 생깁니다.
 
Generic은 이런 문제점을 해결하기 위해 나온 녀석입니다. 백문이 불여일견이라고, 위의 코드를 Generic을 적용해 보도록 하겠습니다.
 
using System.Collections.Generic;
 
Stack< Employee > employees = new Stack< Employee >();
 
// Push 메서드 매개변수가 Employee 형이므로, 형 변환이 필요없음
employees.Push( new Employee() );
// Pop 메서드가 Employee 형을 리턴하므로, 형 변환이 필요없음
Employee employee = employees.Pop();
 
흐음.. 뭔가 좀 좋아진 것 같지요?
아까 좀 심각하다고 했던 코드는 어떻게 되는지 봅시다.
 
Stack< int > sizes = new Stack< int >();
// No boxing
sizes.Push( 42 );
// No unboxing
int size1 = sizes.Pop();
sizes.Push( 77 );
// 아래 코드는 컴파일 시 에러가 발생한다. 
sizes.Push( new Employee() );
// 이제 안심하고 써도 됨 (리턴 타입이 항상 int일테니..)
int size2 = sizes.Pop();
 
자.. 보다시피 < > 안에 특정 타입을 지정해서 코드 템플릿을 만들 수 있게 해줍니다.
그렇게 해서, 특정한 타입만이 사용되도록 보장해주는 것이죠.
이 기능은 C++에서는 템플릿이라고 불리며, Eiffel, Ada와 같은 다른 언어들에서는 Generic이라 불립니다. (대세를 따라서 C#, VB.NET은 후자를 택한 것 같네요.)
Generic은 클래스, 구조체, 인터페이스, 메서드, 대리자(delegate) 등 다양하게 만들 수 있습니다.
 
Generic 사용 시의 장점은..
* 컴파일 타입 체킹을 좀 더 빡세게(?) 수행할 수 있습니다.
* 불필요한 런타임 타입 체킹, 박싱, 언박싱을 줄일 수 있습니다.
* 명시적으로 형 변환을 하지 않아도 됩니다.
* 좀 더 깔끔하고, 빠르고, 안전한 코드를 작성할 수 있습니다.
 
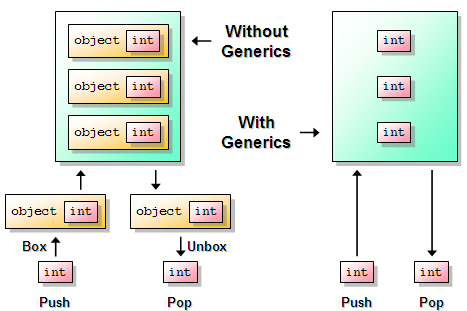
장점을 좀 더 팍팍 와 닿게 하기 위해서.. 다음 그림을 통해 비교해 보죠.
 
왼쪽의 Generic을 사용하지 않은 경우와 오른쪽의 사용하는 경우를 볼 때 어느게 더 복잡해 보이는지요? Generic을 사용하는 것이 훨씬 더 깔끔하다는 것을 알 수 있습니다.
 
자, 그러면 이렇게 Generic을 지원하는 클래스는 어떻게 작성할까요? 예를 들어, 위의 스타일처럼 지원하도록 MyStack이라는 클래스를 작성해보도록 하겠습니다.
 
// Generic MyStack 클래스
public class MyStack< T >
{
   private T[] frames;
   private int pointer = 0;
   public MyStack( int size )
   {
      frames = new T[ size ];
   }
   public void Push( T frame )
   {
      frames[ pointer++ ] =
         frame;
   }
 
   public T Pop()
   {
      return
         frames[ --pointer ];
   }
}
 
대충 감이 잡히시겠지만, 클래스 명 뒤에 < >를 붙이고.. 그 안에 T라고 썼습니다.
이 T는 임의의 템플릿 타입 파라미터(Template Type Parameter)이므로, 이름은 무엇으로 변경해도 상관없습니다. 클래스 내의 메서드 구현 시 T를 사용하고 있는 것에 주의하시기 바랍니다.
 
아래는 위 클래스를 사용하는 예제입니다.
 
// 사용 예제
MyStack< int > s = new MyStack< int >( 7 );
 
// 0~6까지를 Stack에 집어넣음
for ( int f = 0; f < 7; ++f )
   s.Push( f );
 
// '6 5 4 3 2 1 0 ' 을 출력
for ( int f = 0; f < 7; ++f )
   Console.Write( s.Pop() + " " );
아참.. VB.NET에서는 어떻게 하냐구요? 다음과 같이 (Of T) 형태의 구문을 사용합니다.
 
' Generic MyStack 클래스
Public Class MyStack(Of T)
   Private frames As T()
   Private pointer As Integer = 0
 
   Public Sub New( ByVal size As Integer)
      frames = New T(size) {}
   End Sub
 
   Public Sub Push( ByVal frame As T)
      frames(pointer) = frame
      pointer += 1
   End Sub
 
   Public Function Pop() As T
      pointer -= 1
      Return frames(pointer)
   End Function
End Class
 
' 사용 예제
Dim s As New MyStack(Of Integer)(7)
 
' 0~6까지를 Stack에 집어넣음
For f As Integer = 0 To 6
   s.Push(f)
Next f
 
' '6 5 4 3 2 1 0 ' 을 출력
For f As Integer = 0 To 6
   Console.Write( s.Pop().ToString())
Next f
자.. 그러면 위의 템플릿 타입 파라미터.. T를 아무 타입이나 못하게 제약을 걸 수는 없을까요?
물론 가능합니다. Generic에서는 where  키워드를 사용하여 다음 3가지 유형의 제약 조건을 걸 수 있습니다.
* Class 제약 : 타입이 특정 베이스 클래스로부터 상속된 것이어야 함
* Interface 제약 : 타입이 특정 인터페이스를 구현한 것이어야 함
* 생성자 제약 : 타입이 public 기본 생성자를 가져야 함
 
이러한 제약 조건을 걸도록 작성한 Generic 클래스는 다음과 같습니다.
 
class MyList< K, V >
   where K : IComparable, IFormattable
   where V : ValueBase, new()
{
   // ...
}
 
K는 IComparable, IFormattable 인터페이스를 구현한 것이어야 하며..
V는 ValueBase로부터 상속받고, public 기본 생성자가 있는 것이야 합니다.
그럼 MyList를 사용하는 예제를 보죠.
 
// ValueBase 클래스
class ValueBase {}
 
// Widget 클래스 : ValueBase를 상속
class Widget : ValueBase {}
 
// Thing 클래스 : ValueBase를 상속하며, public 기본 생성자가 없음
class Thing : ValueBase
{
   public Thing( int i ) {}
}
 
// OK
MyList<int, Widget> list1 = new MyList<int, Widget>();
 
// Error : string은 ValueBase로부터 상속되지 않음 
MyList<int, string> list2 = new MyList<int, string>();
 
// Error : Thing은 ValueBase로부터 상속되지만, public 기본 생성자가 없음
MyList<int, Thing> list3 = new MyList<int, Thing>();
 
// Error : Point는 IComparable, IFormattable 인터페이스를 구현하지 않음
MyList<Point, Widget> list4 = new MyList<Point,Widget>();
 
위에서 볼 수 있듯이, 제약조건을 사용하면..
* 타입이 필요한 기능을 가졌는지를 보장하고,
* 보다 강력한 컴파일 타임 타입 체킹을 할 수 있으며,
* 명시적 형변환을 줄일 수 있고,
* generic의 사용을 제한하는 효과를 가집니다.
 
지금까지 Generic에 대해서 살펴보았습니다.
어떤가요? 유용할 것 같나요?
뭐, 정답은.. 만드는 사람은 귀찮고, 쓰는 사람은 편하고.. ^^
그럼 나머지 언어 상의 변경사항은 다음에 또 알아보겠습니다.